PiCar - A Pi4 Based RC Car with driven by Python
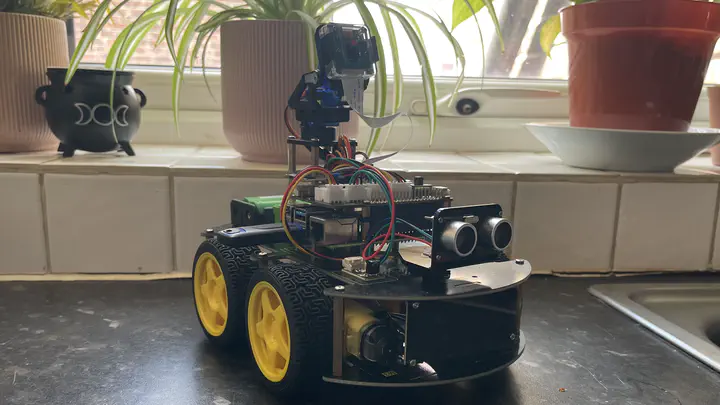 PiCar using the KEYESTUDIO kit
Introduction
This is a small project write up that I put together that got me using my Rasberry Pi 4B with different electrical components and making them interace with eachtoher using Python code.
To give a overview on each section of this write up:
- Mission Statement
- A brief overview on the aims and the point of me under taking this project. Also touches on the resources used in the making of the PiCar.
- Assembly
- Gives a bit of detail on the steps taken in securing each component to eachother.
- Burning the Pi Car Image
- Details on setting up the Pi 4 to boot on USB for and setting up my own Debian Bullseye OS.
- Coding the Python Modules
- A brief review of some small modules created based of what was included in the KEYESTUDIO
raspberry_PiCar_OS.isocar kit.
- A brief review of some small modules created based of what was included in the KEYESTUDIO
Mission Statement
I have been toying around with my Rasberry Pi for a couples year now and finally took the plunge into looking into the more hardware level of the Pi and explore the basics of electronic circuitry.
I have slowly been building up my list of different electrical components recently thanks to bundles such as the :
- FREENOVE RFID Starter Kit for Raspberry Pi 4 B - Amazon
- KEYESTUDIO Raspberry Pi 4WD AI Robot Car Starter Kit - Amazon
The KEYESTUDIO kit was a great launching point, it provided everything needed to get a base RC car set up with the Rasberry Pi 4 with all the base functionality that you would need including :
- 4 Wheel Drive using 4x 4.5V 200r Motors
- Multi Directional Pan Tilt kit with 5MP Pi Camera
- IR Recieving / Transmitting
- Ultra Sonic Distance Detection
It also came with a nice set of acryllic boards to provide the project with a bit of physical structure including a 18650 Battry holder to power the various modules including the Pi itself.
Assembly
There was a useful set of Tutorials that was bundled with the KEYESTUDIO kit that was a great resource to get started. The first tutorial covered assembleing the overall strucuture of the device.
It provided IKEA like instructions guiding you through all the various screw points on the acryllic board and how to attact each of the different compoents securely.
Click Here to see the overall steps taken to Assemle the PiCar
It was great getting a understanding of each different size and type of screw and how they are used for the various modules. The overall steps undertook in the assembly are :
- Attach the Line Tracking module using 8mm screws
- Attach the 4 structural post to the acryllic board using 6mm screws
- Mount the 4x 4.5V 200r Motors using 30mm screws too the structural posts.
- Install the Wheels too the Motors.
- Attach the 6x 40mm Hex Dual-pass copper structure pillars too the acryllic board using 6mm screws.
- Attach the 180 Degree Servo using 10mm Screws
- Attach the Ultrasonic sensor too the Ultrasonic mount using 10mm screws.
- Mount the Ultrasonic Mount to the Servo using the Servo Horn and 2.5mm screws.
- Use the 2.5*10mm Hex Dual-pass copper structure pillars along with the 2.5*6mm screws to mount the Pi4 too the accyllic board
- Mount the IR Receiver with a 3*8mm Screw
- Mount the 3*60mm Hex Dual-pass copper structure pillars that will be used by the Servo Pan Tilt kit.
- Attach the 18650 Battery Holder too the acryllic board.
- Attach the guard board too the 8x16 LED Panel and fit this between board holding the motors and the board holding the Pi. Use 3*6mm screws to hold these in place
- Attach the various wires to each of the already mounted modules.
- Attach the Servo Pan Tilt module to the 3*60mm Hex Dual-pass copper structure pillars
- Mount the 5MP Pi Camera to the clear acryllic board and attach this too the Servo Pan Til Module.
- Attach the 3007 Cooling fan to the Cooling Acrylic Board. Mount this board Under the the Motor Power Pi Shield to help keep the Pi cool. The board can then be mounted too the Rasberry Pi.
- Attach the OLED Display onto the Motor Power Pi Shield.
- Lastly Attach all the wires to Motor Power Board execpt for the Pi Camera Ribbon which is attach directly to the Pi 4
Burning the Pi Car Image
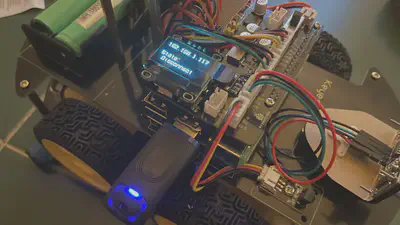
The KEYESTUDIO Kit came with a raspberry_PiCar_OS.iso operating system image that had preinstalled python scripts already set up on a Debian Bullseye Distro, this was handy for initial testing as the base scripts made use of the OLED screen at the top of the the Power Board that gave me the IP address telling me that all my connections were working as expected.
I also took the operunity in setting the boot option on the Pi so that it would boot via a USB device as I thought it would aid in the speed of testing and development. This was done by using the Raspberry Pi Imager utility.
Click Here to the steps for the Raspberry Pi Imager
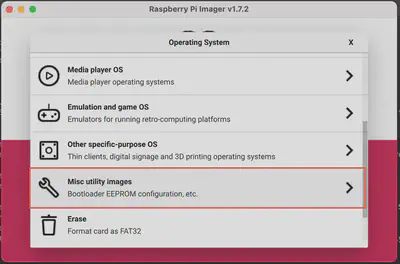
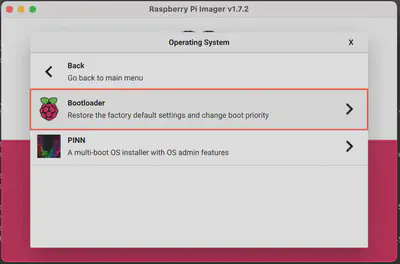
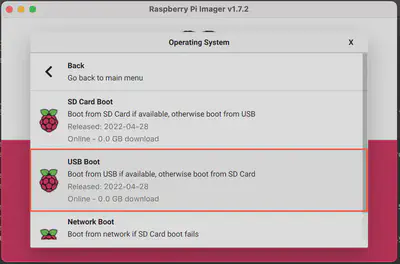
Once I had set up a clean installation of Debian on my other Pi400 Device, I used the Linux Disk Burner program to create a couple of backup USB devices to build off.
After burner the module I included the default OLED python module that was shipped with the KEYESTUDIO kit so that it was able to display the active IP address of the device on start up.
With all this done I was able to power the Pi using 2x 18650 3.7V Batteries and was able to connect to the RC car via SSH and even activate VNC Viewer in order to connect to a virtual remote desktop.
Coding the Python Modules
Come Back soon for more of a update on this project!
Thanks for reading this project. My aim for the next update July 16th 2022